There is a particular kind of kitchen heartbreak reserved for discovering a once-crispy, satisfying handful of nuts has turned soft, chewy, and utterly disappointing. It’s a common plight, often a result of improper storage or simply the passage of time, where these nutritional powerhouses succumb to ambient moisture. The immediate reaction for many is to sadly toss them into the compost bin, resigning themselves to a loss. But what if that fate wasn’t final? What if, with a bit of simple kitchen alchemy, you could bring them back from the culinary brink?
The concept of reviving food is as old as cooking itself. Our ancestors, who lacked the luxury of waste, developed countless techniques to restore and preserve their precious ingredients. This isn't about masking a problem; it's about understanding the science of food and applying fundamental principles to reverse an undesirable state. In the case of nuts, the enemy is unequivocally moisture. Their delightful crunch is a direct result of their low water content. When they absorb humidity from the air, that textural magic disappears. The solution, therefore, is elegantly straightforward: gentle, controlled dehydration.
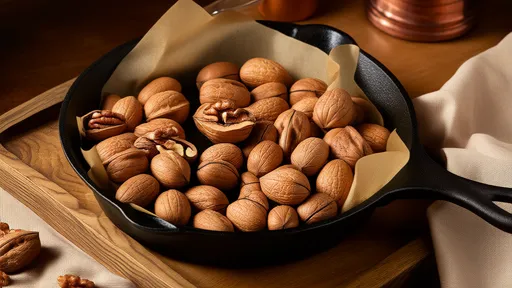
While ovens, air fryers, and specialized dehydrators can do the job, the most accessible, controlled, and effective tool for this revival mission is likely already in your cupboard: a simple, heavy-bottomed skillet or frying pan. The broad, flat surface provides excellent and even heat distribution, which is critical for treating every nut equally without creating scorched spots or leaving others still damp. This method harks back to a time before hyper-specialized gadgets, relying on core cooking intuition and direct heat management.
The process begins with selection. Spread your lethargic nuts on a clean surface and give them a quick inspection. This revival technique is for nuts that are merely soft or stale, not for any that show signs of mold, rancidity, or an off-putting smell. If they smell musty or like old paint, they’ve likely gone rancid due to their high oil content oxidizing, and no amount of heat can salvage them. Safety and quality first. Assuming they pass the sniff test, you're clear for takeoff.
Place your heavy-bottomed skillet or pan on the stovetop. The choice of material matters. Cast iron is a champion here, renowned for its unparalleled heat retention and evenness. A thick-bottomed stainless steel or clad pan also works excellently. Avoid thin, warped pans that can create hot spots and burn your precious cargo before the interior moisture has a chance to evaporate. Turn the burner to its absolute lowest possible setting. This is not a race. Patience is the most crucial ingredient in this entire recipe. The goal is to coax the water out, not to cook the nuts or toast them further.
Add the nuts to the dry, cold pan in a single, even layer. Do not crowd the pan; the nuts need room for the moisture to escape as steam. If you have a large quantity, work in batches. Consistency is key. Now, the active part begins. As the pan slowly comes to temperature, you must become a vigilant guardian of your nuts. This is a hands-on process. Using a wooden spoon or a silicone spatula, begin moving them around constantly, ensuring they are never stationary for more than a few seconds.
This constant motion serves two vital purposes. First, it guarantees that each nut is exposed to the gentle heat evenly on all sides, preventing any one spot from overheating. Second, it allows you to be the sensor. You are listening and watching for the signs of revival. Initially, you might notice a slight steam rising—that’s the trapped moisture making its escape. After a few minutes of this gentle agitation, you will start to hear it: a faint, quiet clicking and popping sound. This is the music of success. It’s the sound of the remaining internal moisture turning to steam and escaping, and the natural oils within the nut warming and settling back into their crispy structure.
The entire process should be a slow dance, taking anywhere from five to ten minutes, depending on the type and initial wetness of the nut. Almonds may take a bit longer than thinner pine nuts, for instance. Trust your senses more than the clock. The visual cue is a slight deepening of color, but far less than if you were actively toasting them. The tactile cue is the ultimate test. Carefully remove one nut, let it cool for a moment (a hot nut will always feel soft), and then taste it. It should be warm, fragrant, and most importantly, returned to its former crunchy glory.
Once perfectly revived, immediately transfer the nuts to a dry, cool bowl or a sheet pan. Letting them sit in the hot pan, even off the heat, carries a high risk of carry-over cooking, which can push them from perfectly revived to unfortunately burnt. Allow them to cool completely to room temperature before even thinking about storage. This final cooling step allows their structure to set firmly. Any residual warmth can lead to condensation in a storage container, undoing all your hard work and sending you right back to square one.
This technique is wonderfully universal. It works beautifully on everything from dense Brazil nuts and walnuts to more delicate pecans, peanuts, and hazelnuts. Even seeds like pumpkin or sunflower seeds can be brought back to a crisp state using this exact method. It’s a testament to the versatility of simple, foundational cooking techniques. There’s no need for a different appliance or setting for each type; the low, slow heat of the pan is the universal key.
Beyond the immediate satisfaction of saving food and money, this practice connects us to a more mindful and resourceful way of interacting with our ingredients. In a world of convenience and disposability, taking five minutes to actively restore something rather than replace it is a small but powerful act. It fosters a deeper understanding of how food behaves and empowers you to be the master of your kitchen, not just a consumer of its contents. It turns a potential moment of waste into a moment of accomplishment.
So, the next time you reach into the pantry and are met with a disappointing chew where a crunch should be, don’t despair. See it not as a failure, but as an opportunity. Reach for that trusty skillet, channel a bit of patience, and perform some simple culinary magic. You’ll be rewarded with not just a bowl of perfectly crisp nuts, but also the quiet satisfaction of a problem solved, a resource saved, and a connection to the timeless, intuitive art of cooking reaffirmed.
By /Aug 20, 2025
By /Aug 20, 2025
By /Aug 20, 2025
By /Aug 20, 2025

By /Aug 20, 2025

By /Aug 20, 2025
By /Aug 20, 2025
By /Aug 20, 2025

By /Aug 20, 2025

By /Aug 20, 2025
By /Aug 20, 2025
By /Aug 20, 2025

By /Aug 20, 2025
By /Aug 20, 2025
By /Aug 20, 2025
By /Aug 20, 2025

By /Aug 20, 2025
By /Aug 20, 2025

By /Aug 20, 2025

By /Aug 20, 2025
